
If you’ve ever stared at a valve catalog wondering, “Which replacement part do I need?” or “Will this fit my existing actuator?” you’re not alone. Pneumatic diaphragm valve replacement isn’t just about swapping parts—it’s about matching the valve to your process, avoiding compatibility headaches, and ensuring it lasts longer than the last one. Whether you’re in food processing, water treatment, or chemical manufacturing, the wrong replacement can mean more leaks, frequent downtime, or even regulatory fines (looking at you, FDA audits).
This guide is for you—the maintenance manager, the plant operator, the buyer who needs to get this right without guesswork. We’ll break down when to replace a pneumatic diaphragm valve, how to choose the perfect replacement (from sanitary pneumatic diaphragm valve to industrial-grade models), common mistakes to avoid, and even pro tips to extend the new valve’s life. Let’s dive in—your production line (and your sanity) depends on it.
When Do You Really Need to Replace a Pneumatic Diaphragm Valve?
First things first: How do you know it’s time to stop patching and start replacing? These are the red flags that mean your valve is beyond repair:
1. Leaks That Won’t Quit (Even After Repairs)
A small drip around the diaphragm or actuator might seem fixable—until you’ve replaced the O-rings, adjusted the actuator pressure, and it still leaks. Pneumatic diaphragm valves rely on a tight seal between the diaphragm and weir; if the diaphragm is cracked, torn, or warped (from chemical corrosion or wear), no amount of tightening will save it.
Example: Your PTFE diaphragm valve in a sulfuric acid line starts leaking after 18 months. PTFE is tough, but constant exposure to 98% acid can degrade the material over time—time for a new diaphragm (or full valve, if the body is pitted).
2. Slow or Erratic Actuation (It’s Not Responding)
Pneumatic diaphragm valves use air pressure to lift or lower the diaphragm. If your valve takes seconds to open/close (instead of the usual 0.5–1 second), or it “sticks” halfway, the actuator or diaphragm could be failing. A worn diaphragm might stretch or harden, making it slow to move. A faulty actuator (like a stuck solenoid) can also cause delays—but if the diaphragm is the culprit, replacement is the only fix.
3. Visible Damage to the Body or Actuator
Cracks in the valve body (from freezing, impact, or corrosion), rusted actuator parts, or stripped threads mean the valve is structurally compromised. Even small cracks can grow under pressure, leading to catastrophic leaks. If you see rust, pitting, or splits, don’t risk it—replace the valve.
4. Frequent Trips or Contamination (Regulatory Risks)
In food, pharma, or biotech, a sanitary pneumatic diaphragm valve with a damaged diaphragm can trap bacteria in crevices, failing CIP (Clean-in-Place) checks. If your valve is causing product contamination or failing audits, replacement isn’t optional—it’s mandatory.

How to Choose the Right Replacement Pneumatic Diaphragm Valve: 5 Key Factors
Now that you know it’s time to replace, the next step is picking the right valve. This is where most buyers go wrong—choosing based on price alone, or assuming “any pneumatic diaphragm valve” will work. Here’s what actually matters:
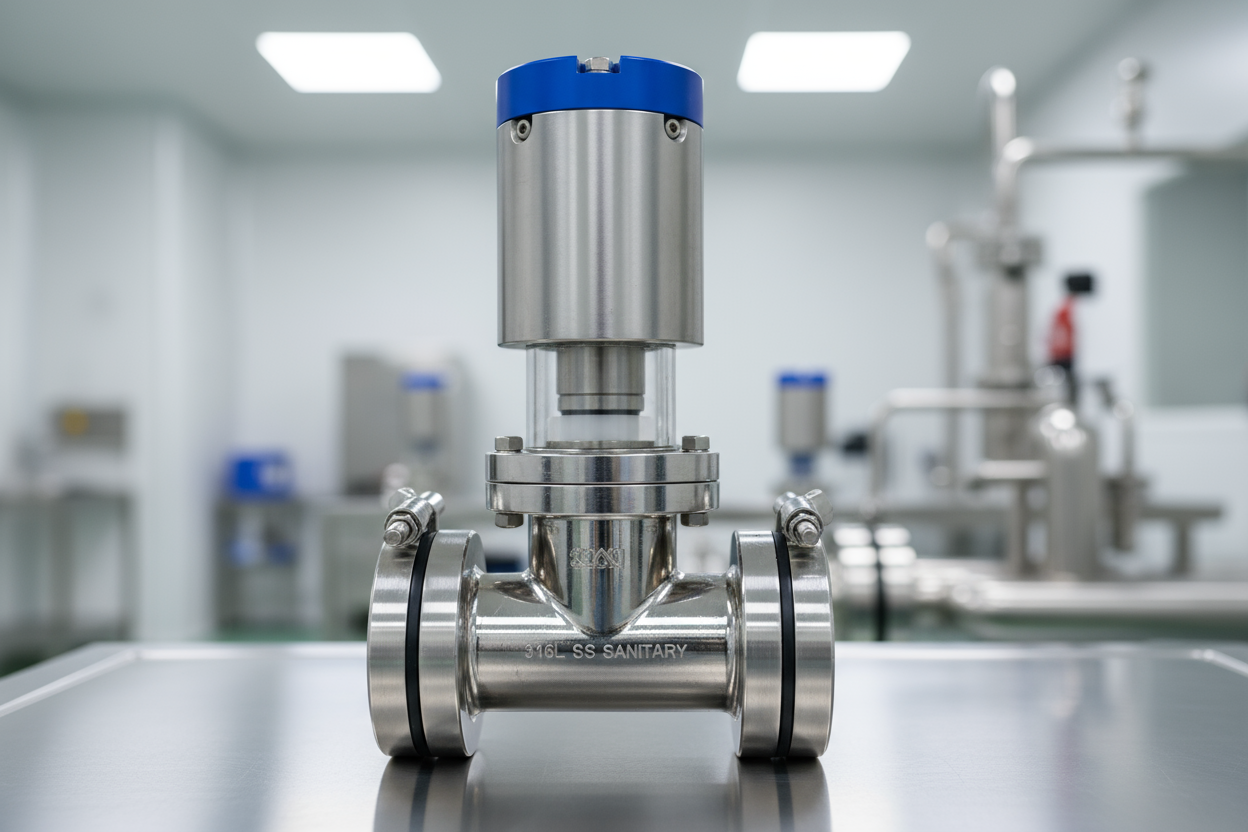
1. Match the Application: Sanitary vs. Industrial
Start with where the valve lives. A sanitary pneumatic diaphragm valve for dairy processing has different needs than an industrial one for wastewater treatment:
- Sanitary applications (food, pharma, beverage): Look for 3-A, FDA, or EHEDG certifications. The valve body should be polished stainless steel (Ra < 0.8μm) with a crevice-free design to avoid bacterial traps. Diaphragms should be food-grade EPDM or silicone.
- Industrial applications (chemicals, oil, wastewater): Prioritize durability. Cast iron or carbon steel bodies work for non-corrosive fluids; stainless steel or PVC for corrosives. PTFE diaphragms handle acids and solvents better than rubber.
2. Diaphragm Material: The “Heart” of the Valve
The diaphragm is the valve’s most critical part—choose the wrong material, and you’ll be replacing it again in months. Match the diaphragm to your fluid:
- Water, mild chemicals, or food products: EPDM (elastic, cost-effective, FDA-compliant).
- Strong acids (H2SO4, HCl), solvents, or high temps: PTFE (chemically inert, heat-resistant up to 260°C).
- Oils, fuels, or hydrocarbons: Nitrile (excellent oil resistance).
Pro tip: If you’re unsure, ask the supplier for a chemical compatibility chart. Using EPDM in oil will cause it to swell and fail—costing you more in downtime.
3. Size and Pressure Rating: Don’t Guess—Measure
A valve that’s too small will restrict flow; too large will waste energy and cost more. Check the existing valve’s size (in inches or mm) and pressure rating (PSI or bar). For example, a 2-inch valve in a water line with 100 PSI needs a replacement rated for at least 100 PSI.
Common mistake: Assuming “bigger is better.” A 3-inch valve in a 2-inch line will cause turbulence and premature wear. Stick to the original size unless your process flow has changed.
4. Actuator Compatibility: Keep or Replace?
If your existing pneumatic actuator is still working (no leaks, smooth operation), you might only need to replace the valve body and diaphragm (a diaphragm valve replacement kit can save money here). But if the actuator is slow, noisy, or corroded, replace the entire valve-actuator assembly.
Look for NAMUR mounting (standard for pneumatic actuators) to ensure compatibility with your existing air lines and controls.
5. Brand and Warranty: Avoid Cheap Knockoffs
It’s tempting to buy the cheapest valve on Amazon, but off-brand pneumatic diaphragm valves often cut corners on materials (thin diaphragms, weak bodies) or skip testing. Stick to trusted brands like ASCO, Bürkert, or Saunders—they offer warranties (1–5 years) and have replacement parts available if you need them later.

Step-by-Step: How to Replace a Pneumatic Diaphragm Valve (Without Breaking Something)
You’ve picked the perfect replacement valve—now it’s time to install it. Rushing this step is a recipe for leaks or damage, so follow these steps:
1. Safety First: Isolate the System
- Shut off the fluid supply upstream and downstream of the valve.
- Depressurize the line (open vents if needed) to avoid sudden spills.
- Disconnect the air supply to the actuator (label hoses so you know where they go back!).
2. Remove the Old Valve
- Use wrenches to loosen the flange bolts or threaded connections (spray with penetrating oil if they’re stuck).
- Lift the old valve out—be careful, it might still have residual fluid.
- Clean the flange faces or pipe threads with a wire brush to remove gunk or old gasket material.
3. Prep the New Valve
- Check the new valve for damage (cracks, dents) before installing.
- Install a new gasket (use the same material as the original—rubber for water, PTFE for chemicals).
- If using a diaphragm valve replacement kit, ensure the diaphragm is seated correctly in the valve body.
4. Install the New Valve
- Align the new valve with the pipe flanges or threads (don’t cross-thread!).
- Tighten bolts evenly (crisscross pattern) to avoid warping the flange—over-tightening can crack the body.
- Reconnect the air supply to the actuator (double-check hose labels!).
5. Test Before Full Operation
- Slowly reopen the fluid supply and check for leaks around the connections and diaphragm.
- Test the actuator: cycle it open/close a few times to ensure smooth operation.
- If no leaks and it works, you’re good to go!
Common Mistakes to Avoid (That Cost Buyers Time and Money)
Even with the right valve, these rookie errors can ruin your replacement:
- Choosing the Wrong Diaphragm Material
Using EPDM in a chlorine line? It’ll degrade in weeks. PTFE in a high-flex application? It’ll crack from repeated bending. Always match the diaphragm to the fluid and temperature.
- Skipping Compatibility Checks
Buying a valve with a different actuator mounting pattern than your existing setup means you’ll need to rework air lines—costing extra time and parts.
- Ignoring Certifications
In food processing, a non-sanitary valve will fail FDA audits. In oil and gas, a valve without API certification could void insurance. Always check for industry-specific stamps.
Pro Tips to Extend Your New Valve’s Life
A little maintenance goes a long way. To avoid replacing your pneumatic diaphragm valve again too soon:
- Clean the valve regularly (CIP for sanitary models, manual cleaning for industrial).
- Lubricate the actuator’s moving parts every 6 months (use food-grade lube for sanitary applications).
- Monitor air pressure—too much can stretch the diaphragm; too little causes slow actuation.
Final Thought: Replacement Done Right = Less Downtime, More Profit
Replacing a pneumatic diaphragm valve isn’t just a repair—it’s an investment in your process’s reliability. By knowing when to replace, choosing the right valve for your application, and installing it carefully, you’ll avoid leaks, pass audits, and keep production running smoothly.
So the next time that valve starts acting up, remember: This isn’t just a part swap. It’s your chance to upgrade—pick a sanitary pneumatic diaphragm valve for your food line, a PTFE-lined one for chemicals, and rest easy knowing you’ve got the right tool for the job.


